
Showing posts with label Pinterest. Show all posts
Showing posts with label Pinterest. Show all posts
Wednesday, May 3, 2017
May the Fourth Be With You--Star Wars Day
Need some inspiration for Star Wars Day tomorrow? Check out some of my pins! (Give it a second to load.)


Monday, April 28, 2014
The ABCs of Hand Washing AND Making Liquid Handsoap
I've been taking a kitchen safety class and learning some new things.
One of the things I've learned is a helpful hint about washing hands? Did you know that you are supposed to wash your hands long enough to sing the ABC Song or Happy Birthday twice?
Want to try an experiment that demonstrates the difference?
First, mix oil with cinnamon and rub it on your hands.
 The first time you wash your hands for only 10 seconds in cold.
Here was mija's result:


One of the things I've learned is a helpful hint about washing hands? Did you know that you are supposed to wash your hands long enough to sing the ABC Song or Happy Birthday twice?
Want to try an experiment that demonstrates the difference?
First, mix oil with cinnamon and rub it on your hands.
Here was mija's result:
You then can repeat the process washing for 10 seconds in warm water. Third, you do 10 seconds using soap in warm water.
A little better, but watch what happens after washing with soap and warm water while singing the ABC Song:
Yup, those are clean hands...the sink is filthy, but the hands are clean.
Now, a way to save money while washing your hands. How about making your own liquid hand soap?
I tried it out this week for the first time using a bar of soap, glycerin, and water.
Here's the site where I found out about how to do it:
Make sure to read all the comments. The next morning it started out as as a soft solid but after I stirred it, it turned into kind of a mucus. I added some more water and warmed it up. Still ended up soft solid and turned gelatinous. Added water and warmed one more time, but this time I whisked it. It made a difference.
It's not big on lather, but works just fine.
So now you know how to wash your hands AND have soap to use!
Tuesday, February 18, 2014
Child Labor Rocks!---Ideas about chores.
Child Labor Rocks! is the name of my Pinterest board where I pin chore ideas. Have you checked it out before?
Follow Betsy Price {Mrs. Price is Right about Homeschooling}'s board Child Labor Rocks! (chores) on Pinterest.
 What we've been using is My Job Chart. It's an online
  job chart. It's simple. You sign up for free, set up what chores and what credit you want to assign, and tada! Bob's you uncle. It's easy to change chores and credits.
Rewards can be simple like going to a park or making cookies. To average? How about having them save credits to purchase things you chose from the from Amazon? The children can even choose to save or donate some of their credits as well.
It has worked well for us.
One thing that has made it "cool" for mija is that I allow her to keep track online using my mini iPad. She doesn't get to use it very often, so having that reason to use it is a plus. So far she has earned an ice cream cone, a game night, and is working to some lip gloss I found on Amazon.
It's free to try it out, so you won't lose anything by trying it out!


In the spirit of full disclosure, this post has an affiliate link, which means I may get a commission if you sign up for My Job Chart. I only recommend things that I love & use myself, so I know you'll be in good hands.
Follow Betsy Price {Mrs. Price is Right about Homeschooling}'s board Child Labor Rocks! (chores) on Pinterest.
job chart. It's simple. You sign up for free, set up what chores and what credit you want to assign, and tada! Bob's you uncle. It's easy to change chores and credits.Rewards can be simple like going to a park or making cookies. To average? How about having them save credits to purchase things you chose from the from Amazon? The children can even choose to save or donate some of their credits as well.
It has worked well for us.
One thing that has made it "cool" for mija is that I allow her to keep track online using my mini iPad. She doesn't get to use it very often, so having that reason to use it is a plus. So far she has earned an ice cream cone, a game night, and is working to some lip gloss I found on Amazon.
It's free to try it out, so you won't lose anything by trying it out!
In the spirit of full disclosure, this post has an affiliate link, which means I may get a commission if you sign up for My Job Chart. I only recommend things that I love & use myself, so I know you'll be in good hands.
Tuesday, July 16, 2013
World Snake Day--Easy snake crafts
Thursday, June 13, 2013
Thursday, May 30, 2013
Father's Day Gifts to Make or have Made
Father's Day is coming up. Unfortunately, I sometimes think it gets overshadowed by the thrill of early summer.
First, let's make remembering it easy by somethings we can have made for dad.


 This site actually has several printable, easy to do gift ideas. I particularly like this "pop" one because it goes to show that it's POP not SODA!!! ;-)
 "Following in your footsteps" bookmarks. I would write that phrase and the child's name, age and the date on the back. So cute!
 Hero Stones. Such a cool idea to keep around where dad can be reminded.
 Mija has started to learn how to crochet, but this is still beyond her at this point. I also like it because you don't seem to see filet crochet as much anymore.
First, let's make remembering it easy by somethings we can have made for dad.
I've had one of these done before. To get it for Father's Day, you need to order by June 1 for Standard Shipping, June 4 for Expedited Shipping, and June 6 for Priority Shipping.
It was so easy to upload. The hardest part was deciding on the photo!
I'm actually thinking about getting this one. My hubby loves mugs. Guaranteed delivery by Father's Day if ordered by May 31. Shipping starts at $5.99. Use the code MYMUG. It's for new customers only.
Now, some Pinterest ideas.
This site actually has several printable, easy to do gift ideas. I particularly like this "pop" one because it goes to show that it's POP not SODA!!! ;-)"Following in your footsteps" bookmarks. I would write that phrase and the child's name, age and the date on the back. So cute!Hero Stones. Such a cool idea to keep around where dad can be reminded. Mija has started to learn how to crochet, but this is still beyond her at this point. I also like it because you don't seem to see filet crochet as much anymore.Wednesday, February 6, 2013
Making Valentine's Cards
Mija will be going to our church's homeschool group next Tuesday, and of course, Valentine's will be exchanged. She's never actually participated in a Valentine exchange before, so I'm sure it will be fun for her.
Not as fun for me, however, since money is scarce. Looking at some Valentines on Pinterest to possibly make. Here are some of my choices.

For the one above, I'd make a template, cut them out and decorate them since I don't have stamps.

I'd have to buy pencils.

It would be a lot of cutting to make enough for the whole group, but really cute.

Cute and usable past Valentine Day.
I'd probably make them smaller to be Valentine cards.
I think this would be cute with "I'm so glad we both home 'school'." Lot's of parts to purchase, however.

I'd have to learn how to help her make a friendship bracelet and then there is printer ink to consider.

This is cute especially since we did some sign language before.
Not as fun for me, however, since money is scarce. Looking at some Valentines on Pinterest to possibly make. Here are some of my choices.
Source: stamping.craftgossip.com via Betsy Price on Pinterest
For the one above, I'd make a template, cut them out and decorate them since I don't have stamps.
Source: mudpiestudio.blogspot.com via Betsy Price on Pinterest
I'd have to buy pencils.
Source: krokotak.com via Betsy Price on Pinterest
It would be a lot of cutting to make enough for the whole group, but really cute.
Source: lessonplans.craftgossip.com via Betsy Price on Pinterest

I'd probably make them smaller to be Valentine cards.

I think this would be cute with "I'm so glad we both home 'school'." Lot's of parts to purchase, however.
Source: lilsugar.com via Betsy Price on Pinterest
I'd have to learn how to help her make a friendship bracelet and then there is printer ink to consider.
This is cute especially since we did some sign language before.
Are you making any cute, homemade Valentines? If so, share your ideas. PLEASE!! I could use some help.
Tuesday, December 11, 2012
Measurement story & pictures---makes it soooo easy
Even when I taught in 5th and 6th grade in the classroom, helping students remember gallons, quarts, pints, and cups was always a pain. I must admit that I would remember long enough for classroom use, but then I would forget it when it came to my kitchen.
Then I found THIS WONDERFUL IDEA on Pinterest. Here's how we put it into action at our house.
 Not as pretty as on Pinterest, but just as practical. Here is mija explaining it.
In case you didn't make it out. Inside the Gallon castle lived four queens (quarts). Each queen had a prince and princess (pints) and each of them had two cats (cups).
This has made these measurements so easy for mija to work with! Hope it helps you, too!
Then I found THIS WONDERFUL IDEA on Pinterest. Here's how we put it into action at our house.

This has made these measurements so easy for mija to work with! Hope it helps you, too!
Wednesday, November 21, 2012
Ten Turkeys in Ten Days--The Finale
Guess what? We ended up with ELEVEN turkeys in ten days!
Two of them were painted yesterday, so we didn't finish them until today. We threw in one more for good measure since I had printed the pages for it. We had a hectic day, so we waited until this evening after the Charlie Brown Thanksgiving special.
The first one from yesterday was a hat! I have it pinned here. I knew it wouldn't actually fit us since it originally only fit a toddler, but I just had to make it. I cut them a little narrow, so they didn't stand up quite as well.
I think they are still cute, however!
 Then mija had an idea for a turkey she wanted to make. I didn't want to hog the turkey spotlight, so we went for it!
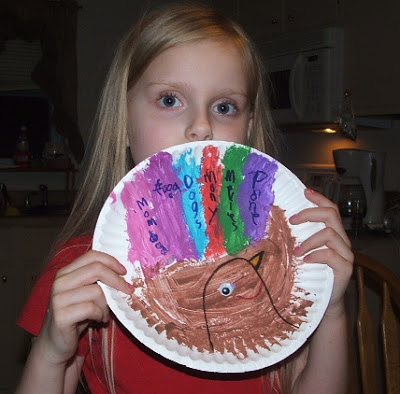 That made ten, but were we finished? No way. Bring on the classic TP roll turkey. Originally we just going to do it all on our own, but I found sheets to color and cut at ABCTeach.com and it's even one of their free items! My hubby jumped in and made one of these, too.
 Thanks for joining us on this turkey journey! Hope you played along. Have a great Thanksgiving.
We're done!

Two of them were painted yesterday, so we didn't finish them until today. We threw in one more for good measure since I had printed the pages for it. We had a hectic day, so we waited until this evening after the Charlie Brown Thanksgiving special.
The first one from yesterday was a hat! I have it pinned here. I knew it wouldn't actually fit us since it originally only fit a toddler, but I just had to make it. I cut them a little narrow, so they didn't stand up quite as well.
I think they are still cute, however!


We're done!

Friday, November 16, 2012
Ten Turkeys in Ten Days--Day 5 doing turkeys 3 & 4
Yup, I'm behind, but not for lack of trying. I became ill and didn't do ANYTHING from Tuesday evening until this morning. It wasn't until this afternoon that I actually had a sense of purpose!
So, today we actually made two turkeys. One which mija could make easily by herself and one that wasn't too hard once I could focus more.
The first was just a color, cut, and glue sheet, but she enjoyed the "independent" aspect.

You can find the Pinterest link HERE.
The second turkey we made today was a turkey wreath. Here's a link to the Pinterest Pin which gave me the idea.

We made ours a little different. We used 1 x 3 inch strips for our loops instead of the 1 x 6 inch loops recommended. We also used googly eyes.
We hung mine on the newly-dubbed turkey wall.

We hung mija's on the front door with the string leaves we made last week.
Now, on to turkey anatomy.
For a loooong time, I have been calling the red, floppy piece that hangs down from above the turkey's beak the wattle. BUT THAT IS WRONG.
The piece that hangs down over the nose is called the snood. The wattle hangs under it's neck.
See, one of the joys of home education is the ongoing education of the parents!
So, today we actually made two turkeys. One which mija could make easily by herself and one that wasn't too hard once I could focus more.
The first was just a color, cut, and glue sheet, but she enjoyed the "independent" aspect.

The second turkey we made today was a turkey wreath. Here's a link to the Pinterest Pin which gave me the idea.

We made ours a little different. We used 1 x 3 inch strips for our loops instead of the 1 x 6 inch loops recommended. We also used googly eyes.
We hung mine on the newly-dubbed turkey wall.

We hung mija's on the front door with the string leaves we made last week.
Now, on to turkey anatomy.
For a loooong time, I have been calling the red, floppy piece that hangs down from above the turkey's beak the wattle. BUT THAT IS WRONG.
The piece that hangs down over the nose is called the snood. The wattle hangs under it's neck.
See, one of the joys of home education is the ongoing education of the parents!
Tuesday, November 13, 2012
Ten Turkeys in Ten Days--Day 2
Here is day 2 in my Ten Turkeys in Ten Days personal challenge. Today, my hubby participated in the turkey making. What a cool daddy!
This one wasn't on my original post. I found it afterwards, but it is posted on my Thanksgiving Pinterest board.
Here's the pin:

The Daddy Turkey

The Mommy Turkey
 The Mija Turkey

What I really thought was cool was the family aspect of the hand prints which makes this a great keepsake!
This one wasn't on my original post. I found it afterwards, but it is posted on my Thanksgiving Pinterest board.
Here's the pin:
The Daddy Turkey

The Mommy Turkey


What I really thought was cool was the family aspect of the hand prints which makes this a great keepsake!
Birthday Cake--Pinterest-style
While this week is mija's birthday, we celebrated on Saturday since The Nutcracker rehearsal is hogging the schedule. She didn't mind getting cake, ice cream, and gifts early!
I actually used the opportunity to use three...yes, three...of my pins from Pinterest! Here are the pins I used.

I didn't follow the recipe on cake, only the method to make a rainbow cake. I only used 4 colors and I didn't switch the colors around.

The basic recipe for this frosting is the classic fruit dip...marshmallow fluff and cream cheese, so you know it tastes good. The difference is a little bit of vanilla. I even was able to put it in a bag and pipe shell work and such with it. I wouldn't recommend it for heavy duty decorating, however.
Because the picture was so small, I actually cheated and purchased the tubes of icing just to save me time. I actually found Wilton tubes cheaper and larger than the Betty Crocker tubes at the grocery store. Two things I recommend after doing this. First, select a cake that can handle a larger picture. My picture was less than a 4 x 6 which made detailing VERY challenging. Second, don't use the Wilton Sparkle Gel. It doesn't freeze which means it doesn't come up neatly when you pull up the wax paper.
Here was my final product.
As I mentioned, it being small was a challenge and the use of gel messed it up some, but on the whole, you can tell it was a pony. The eyes and the cutie mark suffered the most. Mija thought it was cool regardless.
Here is the whole cake.
I left the frosting unsmoothed. I thought it looked more "marshmallow-y" that way.
Now for the piece de resistance which made everyone wonder how I did it...
 I didn't prettify it before I took the photo, but you can see it worked awesome!
And most importantly, the birthday girl thought I was, in her words, artistic, a cake decorator, and talented! This mommy rocked the party.

Oh, yes. She had pink hair. She wanted to look like Pinkie Pie.
I actually used the opportunity to use three...yes, three...of my pins from Pinterest! Here are the pins I used.
Source: omnomicon.com via Betsy Price on Pinterest
I didn't follow the recipe on cake, only the method to make a rainbow cake. I only used 4 colors and I didn't switch the colors around.
Source: tastykitchen.com via Betsy Price on Pinterest
The basic recipe for this frosting is the classic fruit dip...marshmallow fluff and cream cheese, so you know it tastes good. The difference is a little bit of vanilla. I even was able to put it in a bag and pipe shell work and such with it. I wouldn't recommend it for heavy duty decorating, however.


Because the picture was so small, I actually cheated and purchased the tubes of icing just to save me time. I actually found Wilton tubes cheaper and larger than the Betty Crocker tubes at the grocery store. Two things I recommend after doing this. First, select a cake that can handle a larger picture. My picture was less than a 4 x 6 which made detailing VERY challenging. Second, don't use the Wilton Sparkle Gel. It doesn't freeze which means it doesn't come up neatly when you pull up the wax paper.
Here was my final product.
 |
| Twilight Dash |
Here is the whole cake.
 |
| Twilight Dash looks better from a distance! |
Now for the piece de resistance which made everyone wonder how I did it...

And most importantly, the birthday girl thought I was, in her words, artistic, a cake decorator, and talented! This mommy rocked the party.

Oh, yes. She had pink hair. She wanted to look like Pinkie Pie.
Wednesday, November 7, 2012
String Leaves--Fall decorations
First of all, I want to say I know I got this idea on Pinterest, but I can't find my pin for the life of me! I just want to make sure you know that this idea isn't original to me. I don't want false credit!
Second, when I saw it, it was originally done with fall-colored yarns which was very pretty and probably more sturdy than mine. All I had was an orange colored ball of crochet thread. I still think they look cool.
If you remember awhile back, we tried to make the planets with glue and embroidery thread...epic fail. I'd link it for you, but all the photos are gone...epic fail.


The stayed together just fine. I was classy and used scotch tape to put them on our door.


Second, when I saw it, it was originally done with fall-colored yarns which was very pretty and probably more sturdy than mine. All I had was an orange colored ball of crochet thread. I still think they look cool.
 |
| I wanted to make sure it worked, so there's a lot of dried glue left on the leaves! |
We learned our lesson, however, and I didn't water the glue down as much and we used longer pieces of thread.

You'll need glue, leaf printout, waked paper and yarn/thread.
You place waxed paper over your leave printout. I got my leave printout HERE.

Thoroughly soak your thread/yarn in the slightly watered down glue and then place on the waxed paper in the leave shapes anyway you want.

Now, I will admit that because of the failure we had previously with the planets, I made sure there was plenty of glue. That became a failure somewhat just because of dried glue left between the strands of the thread after they dried.
We waited until the next day and gently peeled them off the waxed paper.
 |
| Don't you love my yellow nail polish? |

I think the leaves look pretty cool. You could use this method to make many different items. I'm thinking of trying a turkey! Keep your eyes open!
Remember I'm nominated and would love your daily votes.
Funniest Homeschool Blog
Best Homeschool Variety Blog
Funniest Homeschool Blog
Best Homeschool Variety Blog
Tuesday, October 30, 2012
Bun head--my newest way to make a ballet bun
 |
| Spring Recital 2012 |
 The biggest challenge is getting and keeping mija's hair in a bun. It's long but thin and fine.
 There have been two products that I found that finally kept her bun up and her hair back. One was Big Sexy Hair Volumizing Hairspray

and the other were these Goody Spin Pins. I make a braid and then screw this in and tada, it's a bun.
Well, the other day, mija took her bun out before she got home and lost them.
Now I will admit that I love the "screws" but came across something on Pinterest (of course) that gave me something else to try which actually works.
First, you take an old sock and cut the toe off. Thankfully, I found one of those lonely-socks-which-has-lost-its-mate-in-the-dryer to use. Here's what it looked like when done.


Then you flip the hair over the sock making sure to cover all the sock.
 After it's all covered, you slip a ponytail holder over the hair-covered sock.
 The hair that is hanging out is twisted around and around the ponytail holder. Now the Pinterest link used bobby pins. We didn't have bobby pins, so we just used little clips all around.
 It's easy enough and has been good about staying in place. I think I'll fold the sock over more so the bun doesn't stick out as far next time.
I still want to get more "screws" before The Nutcracker, but this way is working just fine in the meantime.

Uploaded with ImageShack.us


I still want to get more "screws" before The Nutcracker, but this way is working just fine in the meantime.
Uploaded with ImageShack.us
Subscribe to:
Posts (Atom)